Pricing and specifications subject to change without notice.
Here is a wiring diagram of the
E-MU 0202.

Note
the funny connector for the Left channel line input. It
will accept an XLR mic level input jack or a 1/4" mono line level phone
plug. A
pair of 1/8"
mono to 1/4" mono
cables are needed to connect from LP-PAN to the EMU. Radio
Shack part #42-2433 is perfect for the job, or you can "roll your own".
You can use stereo plugs at the LP-PAN side if you make your own, but
wire them for mono. On the EMU side, don't use stereo plugs, as they
can get hung up in the funny connector and damage it.
Note also that the E-MU needs USB 2.0 to work at 192 kHz. Below is a link to a copy of the last release version of the E-MU USB driver. Warning! When installing this driver, the control panel is also updated as well as the firmware in the E-MU hardware. The new firmware may be incompatible with some E-MU 0202s. Creative is aware of this. The driver only supports XP, XP64, Vista and Vista 64. It should work with E-MU 0202 and Tracker Pre. I don't think it will work with the 0204.
EMUU_PCAppDrvFw_L6_1_30_07
There is also a beta for Windows 7, 32- and 64-bit. This should only be used only with Windows 7 for E-MU 0202 or Tracker Pre. This is driver only. It is known to have some bugs...
EMUU_PCAppDrv_US_1_40_00_BETA.zip
If you have the 0204, you will have to use the driver that came with the sound card. Creative does not have the current driver posted anywhere, but there is a guy on the LP-PAN User Group who has a copy that can be downloaded. Try querying the group about this, or search the archives.
Here is a link to a copy of the original CD that came with the 0202 / 0204, courtesy of Darren, G0TSM. Some users have reported success using this their 0202 or 0204 on win7 and win10. Some have reported selecting XP Compatilibility mode, while others didn't. I have no ideal if this will work with all ages and firmware revisions of the cards, but it's worth a try if you have one of these cards, or if you find one a bargain price on eBay...
EMU_0204_Installation_CD.zip
The input pots on the E-MU should be set at or about 11 o'clock to start with, and both set to the same level.
E-MU
0202/0204 Installation
Install
E-MU 0202/0204 USB sound card per the material that was supplied with
the
card.
Important under Windows 7 or Vista : If you are using Windows 7, and wish to use the E-MU 0204 with programs that don't support the ASIO driver, such as CW-Skimmer, you will need to set up the E-MU in the "Recording Devices" tab of the Windows sound mixer. Please right click on the speaker icon of the task-bar: a pop-up menu will appear. Select the Recording devices submenu and a new Sound form will pop up. Click on the recording device you are using, and then click on the Properties button. Click the Advanced tab and under Default Format, select the highest sample rate and resolution that you will use with your sound card (typically 24bits/192000Hz for an EMU202, EMU1212m and Quartet); close the sound form. Now, please configure your sound card using the utility provided with your driver (i.e the EMU or Quartet control panel) and configure it for the same settings. Click on the Levels tab abd set the recording level to 2.
From WA4KBD...
One happy discovery that might help eliminate some E-MU 0204 USB soundcard driver angst for Win 7 64 bit users: Windows 7 64 bit has an E-MU driver resident in the operating system. This driver will *not* automatically install when the 0204 card is first plugged in, but is easily installed from Device Manager via the Update Driver utility. Win 7 will find the driver and install the 0204 card in about 5 seconds. The driver does not seem to have a graphical user interface, but works fine on my system with NaP3 for sampling rates up to 192K. This driver is dated 11-12-2010 and is version 6.6.1.1 by Creative Labs. Follow Larry's instructions for defaulting the sample rate to 192 K in Windows mixer setup and set the output to something other than the EMU 0204 in NaP3 setup and it should work well.
Below is a picture of what the PowerSDR Audio Setup tab should look like for this card. You may or may not need the Expert mode selected. On my older PC, setting a latency of 2ms helped the card start reliably. All other settings should be matched exactly as shown, except "Line In Gain", "Mic In Gain" and "Output Voltage" which are meaningless in the context of LP-PAN.
Below is a picture of what the PowerSDR Audio Setup tab should look like for this card. You may or may not need the Expert mode selected. On my older PC, setting a latency of 2ms helped the card start reliably. All other settings should be matched exactly as shown, except "Line In Gain", "Mic In Gain" and "Output Voltage" which are meaningless in the context of LP-PAN.
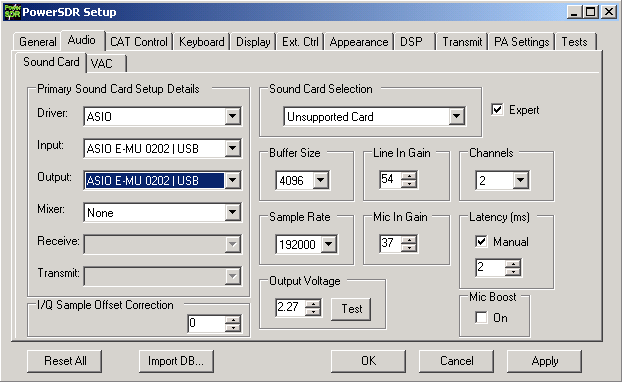
Note: If you plan to feed a second program, like CW Skimmer at the same time as PowerSDR, you will need to select MME drivers in both programs. With the MME driver, latency should be set to 25ms.
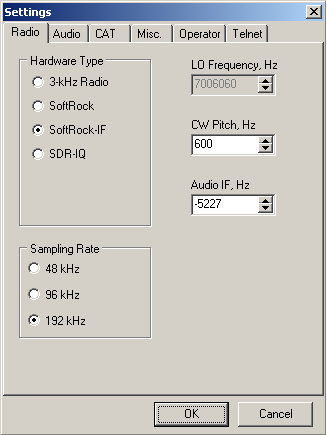
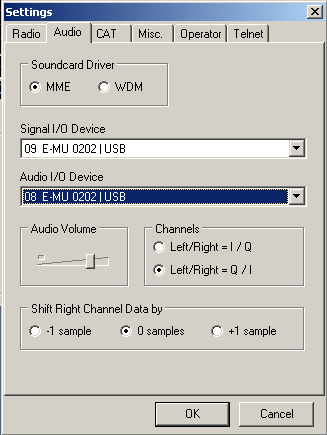
If you plan to use CW Skimmer simultaneously with PowerSDR, use the following pictures as a guideline for setting up Skimmer. Your "Audio IF, Hz" setting will be different than mine. A ballpark setting can be found using this formula...
CW Pitch - Global Offset = Audio IF, Hz
CW Pitch is the setting in the K3. It should also be set in PowerSDR and LP-Bridge to match.
Global Offset is the setting in PowerSDR>Setup>SoftRock IF Stage tab. You will need to fine tune it after the initial setting. Use the default CW filter in the K3 when doing this. Make sure the DSP controls are set to NORmal, as they shift the Skimmer display if not.